Writing your own code#
NetSim allows the user to write the custom code for all the protocols by creating a DLL (Dynamic Link Library) for their custom code.
There are various important steps in this process, and each of these steps has various options as explained in the subsequent pages.
Microsoft Visual Studio 2019 Installation Settings#
NetSim requires only a few components of Visual Studio Community 2019 edition to be installed. Upon starting the installer:
- Under the Workloads tab users can select Desktop Development with C++ as shown below Figure 9‑1.
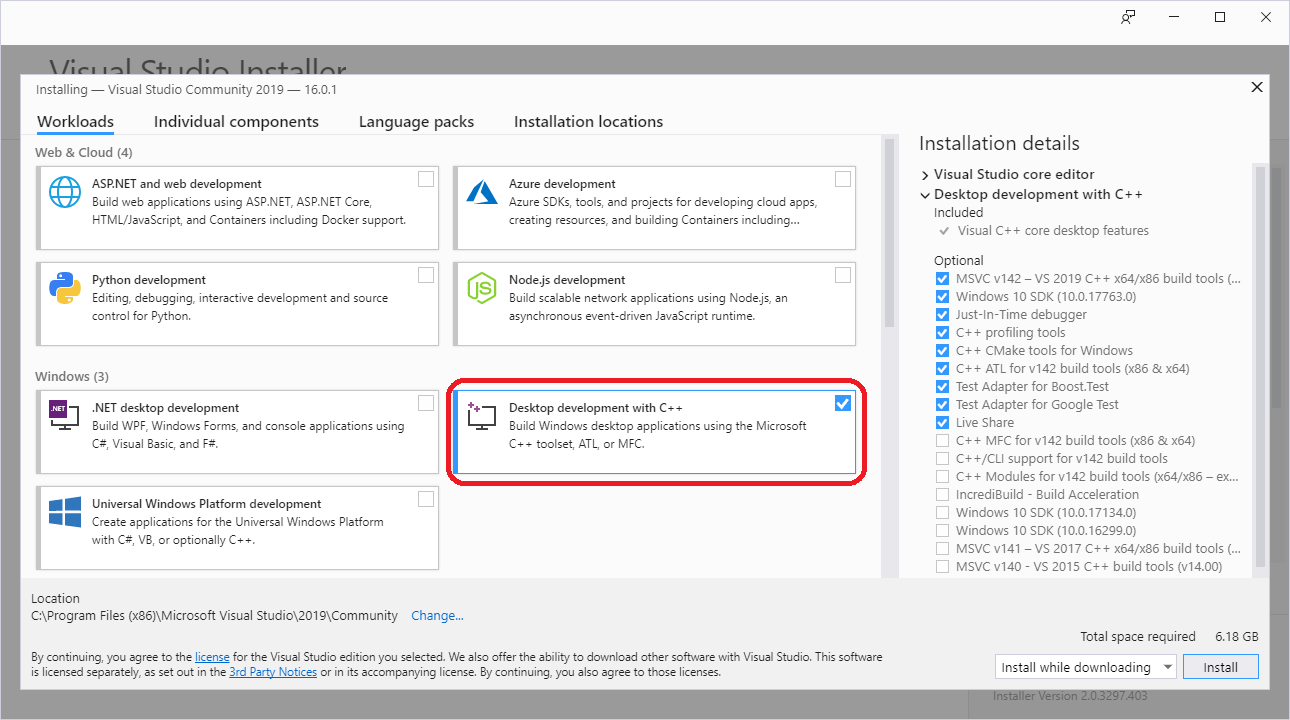
Figure 9‑1: In Workloads tab select Desktop Development with C++
- Under the Individual components tab select VC++2015.3 V140 toolset for desktop (x86, x64).

Figure 9‑2: In Individual components tab select VC++2015.3 V140 toolset for desktop (x86, x64).
Modifying code#
DLL is the shared library concept, implemented by Microsoft. All DLL files have a .dll file extension. DLLs provide a mechanism for sharing code and data to upgrade functionality without requiring applications to be re-linked or re-compiled. It is not possible to directly execute a DLL, since it requires an EXE for the operating system to load it through an entry point. NetSim requires Visual Studio Compiler for building DLL's.
Note: Make sure that Visual Studio 2015 or above is installed in your system.
Refer section 4.13 section "How does a user open and modify source codes" to open NetSim Source Codes
- After this you may modify the source codes of any project. You can also add new files to the project if required. As an example, let us make a simple source code modification to TCP. Inside Solution Explorer pane in Visual Studio, double click on TCP project. Then open TCP.c file by double clicking on it. Using the drop down list of functions that are part of the current file, choose fn_Netsim_TCP_Init().
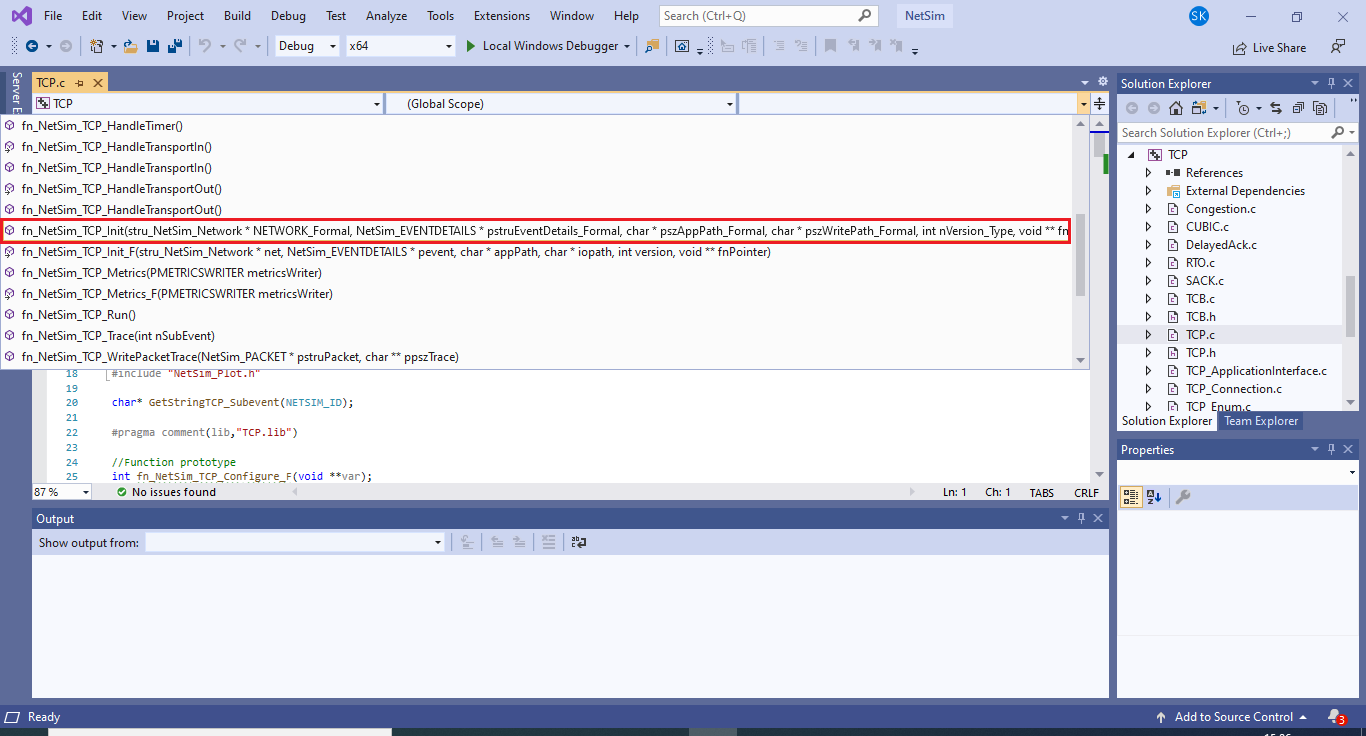
Figure 9‑3: Select fn_Netsim_TCP_Init() in TCP.C in Visual Studio
- Add the line fprintf(stderr, \"\nSource is Modified\n\"); statement inside the fn_Netsim_TCP_Init() function as shown below to print "Source is modified". _getch(); is added in the next line for the simulation to wait until it gets a user input.

Figure 9‑4: Source Code modified in fn_Netsim_TCP_Init() function in TCP project
Building Dlls#
-
Identify the build of NetSim that is installed in your system from NetSim Home Screen as shown below.

Figure 9‑5: In NetSim Home Screen Identify the build of NetSim
- By default, x64 is choose for 64-bit version of NetSim. These changes will be automatically applied to all projects that are displayed in the Solution Figure 9‑6.
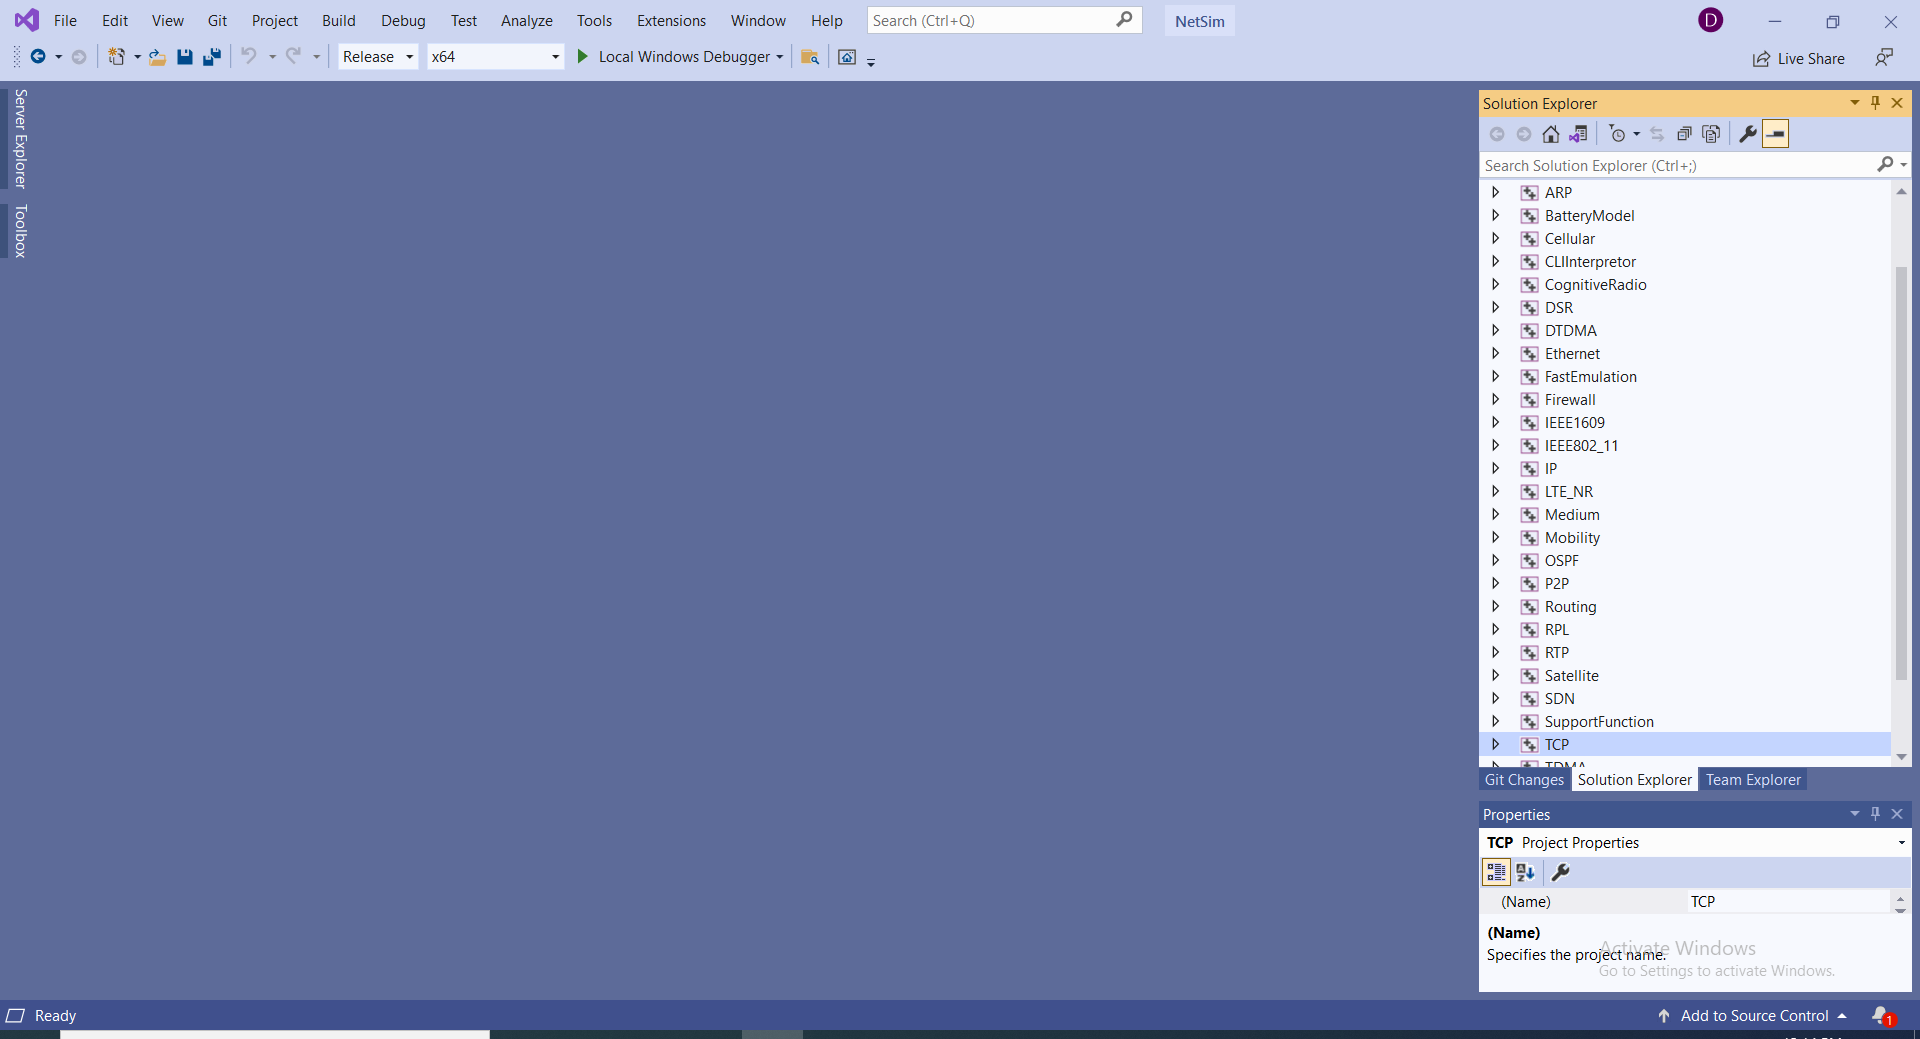
Figure 9‑6: Based on the build of NetSim select x64 in Visual studio
- Now rebuild the network by right clicking on the project header and selecting Rebuild creates a Dll file in the bin folder of NetSim's current workspace path.
\< C:\Users\PC\Documents\NetSim\Workspaces\\<Your default workspace>\bin_x64> for 64-bit which contains your modifications. If build is successful a message similar to the following will be displayed in the output window as shown below.

Figure 9‑7: Build is successful a message similar to the following will be displayed in the output window
Running Simulation#
- After rebuilding the code, user can run the simulation via GUI (Please refer section 3). In this case, user can create a scenario in any network which involves TCP protocol. Running the simulation with the custom DLL will initially display a warning message as shown below.

Figure 9‑8: Modified Project display a DLL warning message to NetSim Console
- The warning message lists the Dll files which have been modified in the bin folder (bin\bin_x64 for 64-bit) of NetSim's current workspace path. After pressing any key, the statement "Source is modified" will be printed to console as shown below.

Figure 9‑9: Printf Statement written to console
-
Press any key to proceed with the simulation.
-
The warning message will not be displayed if no Dll's are modified in the bin folder of current workspace path (bin\bin_x64 for 64-bit).
Source Code Dependencies#
The following are the list of projects that are part of NetSim source codes present in \<NetSim_Install_Directory>/src/Simulation directory and their dependencies:
| PROJECT | DEPENDENCY |
|---|---|
| Application | IP |
| Cellular | Application |
| CLIInterpertor | Firewall, IP |
| Cognitive Radio | Application |
| Ethernet | Firewall |
| IEEE802_11 | Battery Model |
| OSPF | IP |
| Routing | IP |
| RPL | IP |
| ZigBee | Battery Model |
| ZRP | IP |
| Aloha | - |
| AODV | - |
| ARP` | - |
| Battery Model | - |
| CSMACD | - |
| DSR | - |
| Firewall | - |
| IEEE1609 | - |
| IP | - |
| LTE NR | |
| Mobility | - |
| P2P | - |
| SDN | - |
| Support Function | - |
| TCP | - |
| Token_BR | - |
| UDP | - |
| UWAN | |
| DTDMA | - |
| TDMA | - |
| Satellite Comm. Networks | - |
Table 9‑1: Source Code Dependencies
For E.g.: To perform modifications to Application Project, IP folder will also be required in addition to lib folder, Include folder and NetSim.sln file.
Enabling Additional Security Checks#
SDL -- Security Development Lifecycle checks adds recommended Security Development Lifecycle. These checks include extra security-relevant warnings as errors, and additional secure code-generation features.
/sdl enables a superset of the baseline security checks provided by /GS and overrides /GS-. By default, /sdl is off. /sdl- disables the additional security checks.

Figure 9‑10: Enabling Additional Security Checks application properties window
If SDL checks is enabled (/sdl), following warnings will be treated as errors:
| Warning enabled by /sdl | Equivalent command-line switch | Description |
|---|---|---|
| C4146 | /we4146 | A unary minus operator was applied to an unsigned type, resulting in an unsigned result. |
| C4308 | /we4308 | A negative integral constant converted to unsigned type, resulting in a possibly meaningless result. |
| C4532 | /we4532 | Use of continue, break or goto keywords in a __finally/finally block has undefined behavior during abnormal termination. |
| C4533 | /we4533 | Code initializing a variable will not be executed. |
| C4700 | /we4700 | Use of an uninitialized local variable. |
| C4703 | /we4703 | Use of a potentially uninitialized local pointer variable. |
| C4789 | /we4789 | Buffer overrun when specific C run-time (CRT) functions are used. |
| C4995 | /we4995 | Use of a function marked with pragma deprecated. |
| C4996 | /we4996 | Use of a function marked as deprecated. |
Table 9‑2: SDL Warnings Messages
Implementing your code - Examples#
Hello World Program#
Objective: Print Hello World from TCP protocol.
Implementation: Add fprintf (stderr, "\<MESSAGE>") statement inside the source code of TCP as shown below to print "Hello World" when custom built dll is executing.
fprintf(stderr, \"\nHello World\n\");
_getch();

Figure 9‑11: Hello World Printf Statement added in TCP Project
Build DLL as explained in Section 9.1.3 and run the simulation, you can see the following output on the console.
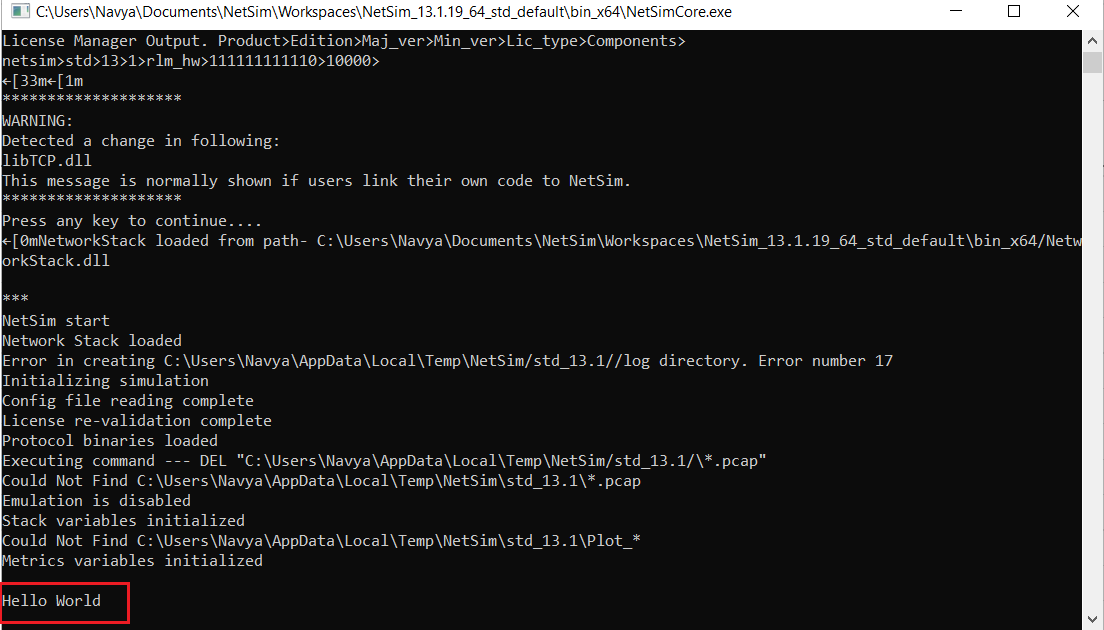
Figure 9‑12: Hello World Statement written to console
Press enter then simulation will continue.
Introducing Node Failure in MANET#
Objective: Node failure using MANET-DSR using Device Id.
Implementation: Identify the Device ID of the particular node to be failed.
Step 1: Create a file with the name NodeFailure.txt inside the bin folder of NetSim's current workspace path
\<C:\Users\PC\Documents\NetSim\Workspaces\\<Your default workspace>\bin_x64> for 64-bit.
The file will contain two columns: one being the Node ID of the device to be failed and other being the failure time (in microseconds).
For example, to fail Node Id 2 from10^th^ sec onwards and fail Node Id 1 from 90^th^ sec onwards, the NodeFailure.txt file will be as follows Figure 9‑14.

Figure 9‑13: NodeFailure.txt file
Step 2: Go to DSR.c in DSR protocol.
Step 3: The function fn_NetSim_DSR_Init() will execute before the protocol execution starts. So, in this function, we will read the NodeFailure.txt and save information regarding which nodes will fail at which time. Add the following code inside the specified function.
int i;

FILE\* fp1;

char\* pszFilepath;

char pszConfigInput\[1000\];

pszFilepath = fnpAllocateMemory(36, sizeof(char) \* 50);

strcpy(pszFilepath, pszAppPath);

strcat(pszFilepath, \"/NodeFailure.txt\");

fp1 = fopen(pszFilepath, \"r\");

i = 0;

if (fp1)

{

while (fgets(pszConfigInput, 500, fp1) != NULL)

{

sscanf(pszConfigInput, \"%d %d\", &NodeArray\[i\], &TimeArray\[i\]);

i += 1;

}

fclose(fp1);

}
Step 4: The fn_NetSim_DSR_Run() is the main function to handle all the protocol functionalities. So, add the following code to the function at the start.
int i, nFlag = 1;

if (nFlag)

{

for (i = 0; i \< 100; i++)

if ((pstruEventDetails-\>nDeviceId == NodeArray\[i\]) &&

(pstruEventDetails-\>dEventTime \>= TimeArray\[i\]))

{

pstruEventDetails-\>nInterfaceId = 0;

pstruEventDetails-\>pPacket = NULL;

return 0;

}

}
Step 5: Add the following code inside DSR.h header file.
//Node failure model

int NodeArray\[200\];

int TimeArray\[200\];
Step 6: Build DLL as explained in Section 9.1.3.
Step 7: Create a scenario in MANET with DSR Protocol. where data packets should be travelling from source to destination through the mentioned node in NodeFailure.txt file. For that user can increase the pathloss exponent value and the distance among the nodes. User can utilize Packet Animation to check the node failure (i.e. no packets are forwarded by failed nodes) after the mentioned time.
Debugging your code#
This section is helpful to debug the code which user has written. To write your own code please refer Section 9.1.2.
Via GUI#
Debugging your code via GUI there are two methods available.
-
Using _getch()
-
Using Environment Variables (NETSIM_BREAK)
Using _getch()#
Step 1: Perform the required modification of the protocol source code and add _getch() (used to hold the program execution until the user enters a character) statement inside init function of the modified protocol. For example, take TCP protocol and add the following lines of code in the init function as shown in the below screenshot Figure 9‑14.
fprintf(stderr, \"\nAttach to Process now\n\");
_getch();

Figure 9‑14: Added Two line of Code in TCP protocol
Step 2: Build the TCP protocol as explained in Section 9.1.3. Do not close Visual Studio.
Step 3: In NetSim, create a network scenario where the protocol is being used and start the simulation. In the console window user would get a warning message shown in the below screenshot Figure 9‑16 and the simulation will pause for user input (because of _getch() added in the init function)

Figure 9‑15: Attach to Process Statement written to console
Step 4: In Visual Studio, put break point inside the source code where you want to debug.
Step 5: Go to "DebugàAttach to Process" in Visual studio as shown and attach to NetSimCore.exe.

Figure 9‑16: Debug > Attach to Process in Visual studio

Figure 9‑17: Select NetSimCore.exe in Attach to Process Window
Click on Attach. Press enter in the command window. Then control goes to the project and stops at the break point in the source code as shown below Figure 9‑19. All debugging options like step over (F10), step into (F11), step out (Shift + F11), continue (F5) are available.

Figure 9‑18: Control goes to the project and stops at the break point in the source code
After execution of the function, the control goes back to NetSim and then comes back to the custom code the next time the function is called in the simulation.
To stop debugging and continue execution, press Shift+F5 (key). This then gives the control back to NetSim, for normal execution to continue.
Using Environment Variable#
This section is helpful to Debug Using Environment Variable (NETSIM_BREAK). To set Environment variable follow the steps as shown.
Note: Setting NETSIM_BREAK Environment Variable will cause the simulation to slow down and it is recommended to remove this Environment Variables after debugging the simulation
Step 1: Right click on My Computer\ This PC and select Properties.
Step 2: Go to Advanced System setting à Advanced Tab à Environment Variables option
Step 3: Click New in System variables. Type "NETSIM_BREAK" as Variable name and any positive integer as variable value (e.g., 2). Click OK. The value of the variable is the event ID at which you want NetSim Simulation to break. In this example we have set the value to 2, which means that the simulation will break at the previous event.
Note: After adding NETSIM_BREAK in environment variable, user should restart the computer otherwise it won't affect the simulation.

Figure 9‑19: Environment Variable Window

Figure 9‑20: Add Variable name and Variable Value in New in System Variable
Step 4: Open NetSim and then open the source codes. Please refer Section 4.13 "How does a user open and modify source codes" for more information.
Step 5: Create a network scenario in NetSim (Internetworks or any other networks)

Figure 9‑21: Network Topology
Step 6: In this example we are placing a break point in TCP source code and thus TCP should be select in Application properties window.
Step 7: Enable Event trace option and run the simulation.
Simulation will break at event ID 1 as we have set the environment variable to 2 as shown below.

Figure 9‑22: Simulation will break at event ID 1
Here NetSim breakpoint has been triggered.
Step 8: Inside Solution Explorer pane in Visual Studio, double click on TCP project. Then open TCP.c file by double clicking on it. Using the drop down list of functions that are part of the current file, choose fn_NetSim_TCP_Run().
Step 9: In Visual Studio, Set the breakpoint in the code by clicking on the grey area on the left of the line or by right clicking on the line and selecting Breakpoint->Insert Breakpoint.

Figure 9‑23: Added Break point in line number 50
Step 10: Go to "DebugàAttach to Process" in Visual studio as shown Figure 9‑24 and select NetSimCore.exe from the list of processes displayed.

Figure 9‑24: Debug > Attach to Process in Visual studio

Figure 9‑25: Select NetSimCore.exe in Attach to Process Window
Click on Attach. Press any key in the command window to continue the process.
Step 11: Now we need to enter next event ID to break.

Figure 9‑26: Enter next event ID to break
Then control goes to the project and stops at the break point in the source code (NetSim will break wherever user has set the breakpoint) as shown below Figure 9‑27. All debugging options like step over (F10), step into (F11), step out (Shift + F11), continue (F5) are available.

Figure 9‑27: Control goes to the project and stops at the break point in the source code.
After execution of the function, the control goes back to NetSim and then comes back to the custom code the next time the function is called in the simulation. To stop debugging and continue execution, press Shift+F5 (key). This then gives the control back to NetSim, for normal execution to continue.
If NETSIM_BREAK environment variable is set, NetSim event trace file additionally logs the file name and line number of the source code where the event was added as shown below:

Figure 9‑28: NetSim event trace file additionally added two columns the file name and line number of the source code.
Via CLI#
Modify the TCP protocol and build the code. Create a scenario in Internetworks then follow the below steps.
Step 1: Open the Command prompt. Press "windows+R" and type "cmd".
Step 2: To run the NetSim via CLI copy the path where "NetSimCore.exe" is present.
>cd \<apppath>
>NetSimCore.exe\<space>-apppath\<space>\<apppath>\<space>-iopath\<space>\<iopath>\<space>-license\<space>5053@\<ServerIP Address>\<space> -d
Step 3: Type the following command.

Figure 9‑29: Run the NetSim via CLI Mode use the following Command.
Press enter, now you can see the following screen.
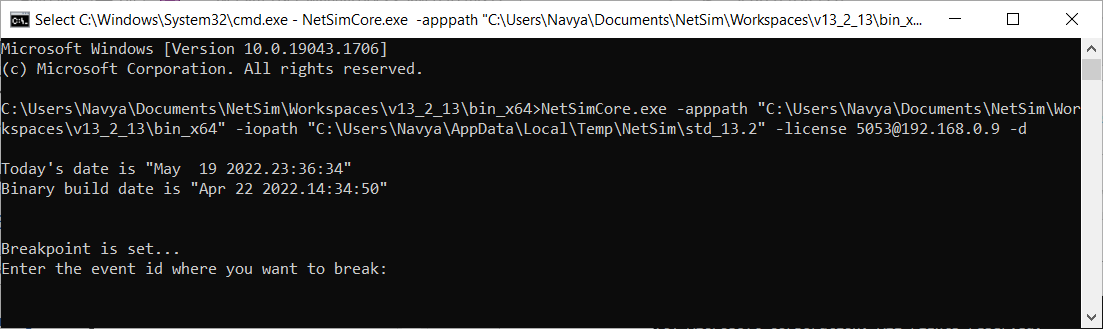
Figure 9‑30: Enter the Event ID
Step 4: Open the Project in Visual Studio and put break point inside the source code.
Step 5: Go to "DebugàAttach to Process".
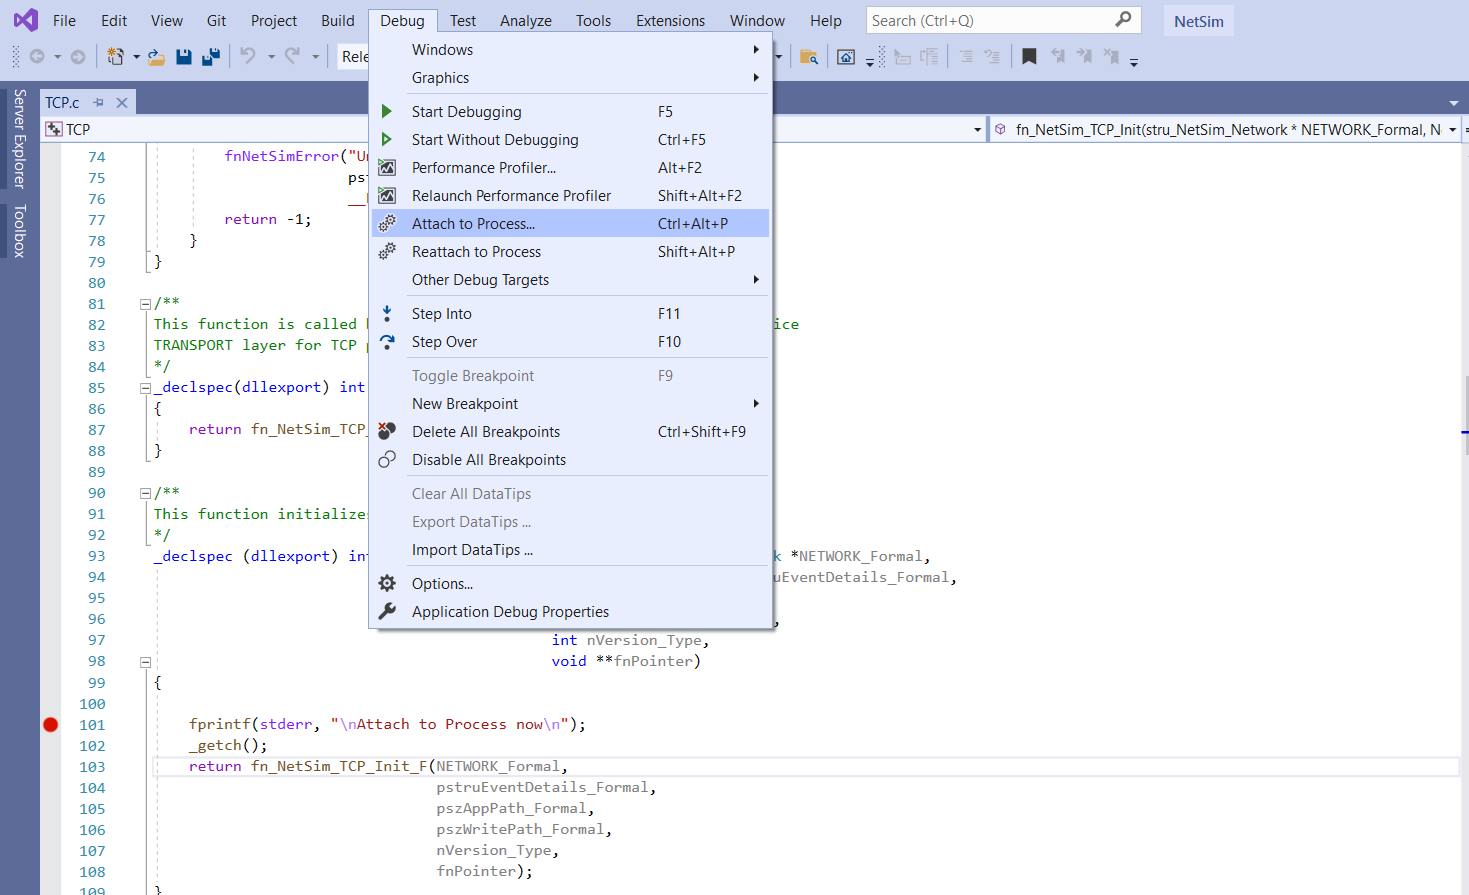
Figure 9‑31: Debug > Attach to Process
Attach to NetSimCore.exe.

Figure 9‑32: Select NetSimCore.exe in Attach to Process Window
Click on Attach.
Step 6: Go to command prompt which is already opened in Step 3. Enter the Event Id.
Note: If you do not want to stop at any event you can specify 0 as event id.
Figure 9‑33: Enter the Event Id
Execution will stop at the specified event.

Figure 9‑34: Execution stops at the specified event
Press enter then control goes to the project and stops at the break point in the source code as shown below.

Figure 9‑35: Control goes to the project and stops at the break point in the source code
All debugging options like step over (F10), step into (F11), step out (Shift + F11), continue (F5) are available.
After execution of the function, the control goes back to NetSim and then comes back to the custom code the next time the function is called in the simulation.
To stop debugging press Shift+F5. This then gives the control back to NetSim, for normal execution to continue.
Co-relating with Event Trace#
To debug your own (custom) code, it is often helpful to know which section of the code (file name & line number) generated the event under study. There are 2 ways to enable this feature.
Procedure 1
Step 1: Open configuration.netsim file and provide the file name, path and set status as Enable.
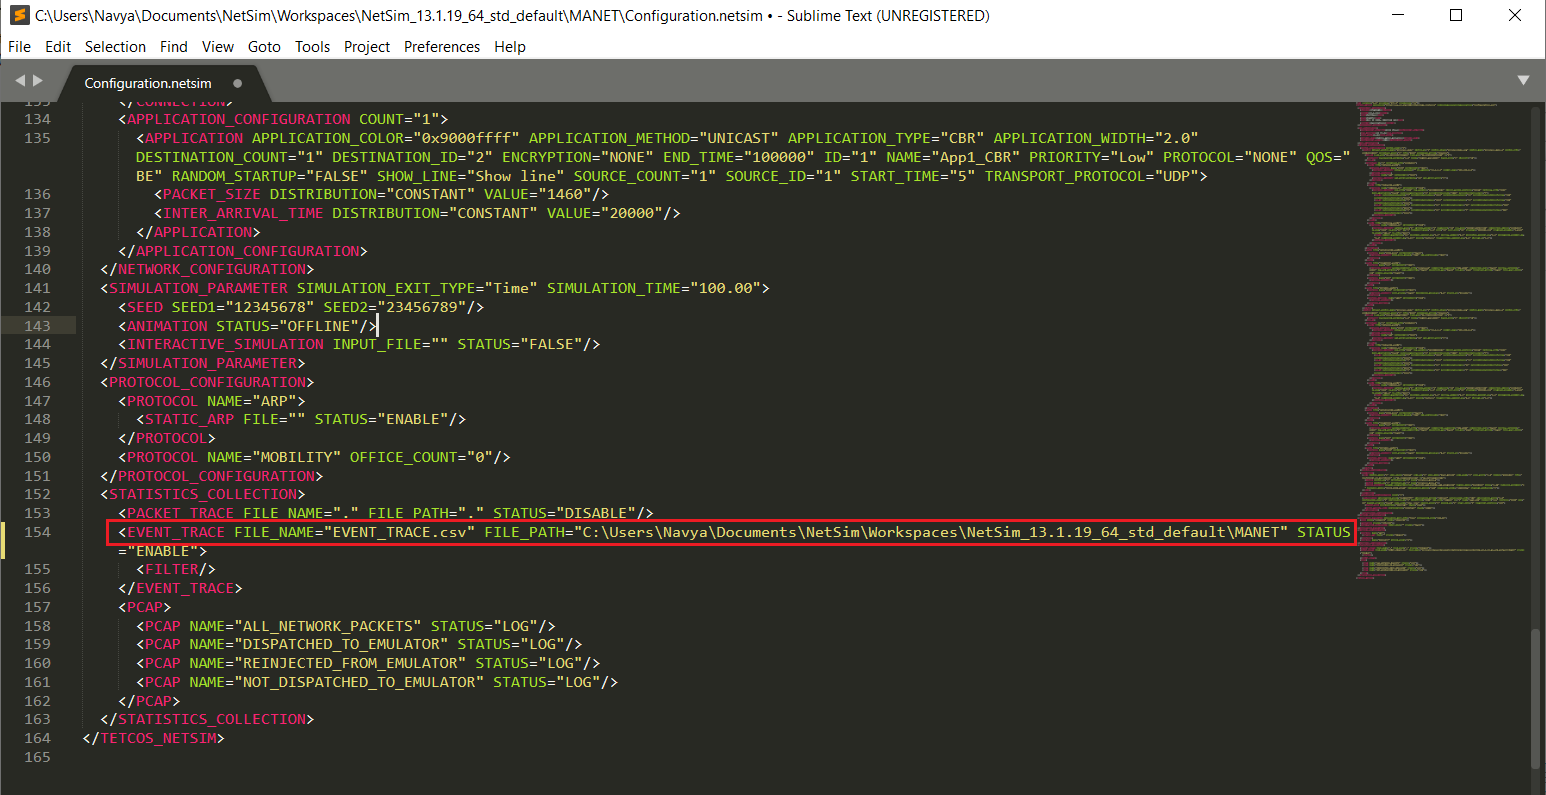
Figure 9‑36: Enable Event Trace by editing Configuration.netsim and provide the file name, path and set status as Enable
Step 2: Run the NetSim via CLI in debug mode (Refer NetSim Help in Section 7àRunning Simulation via CLI) with --d as the fourth parameters.
Press enter.

Figure 9‑37: Run the NetSim via CLI
Step 3: Enter -1 as the event ID.
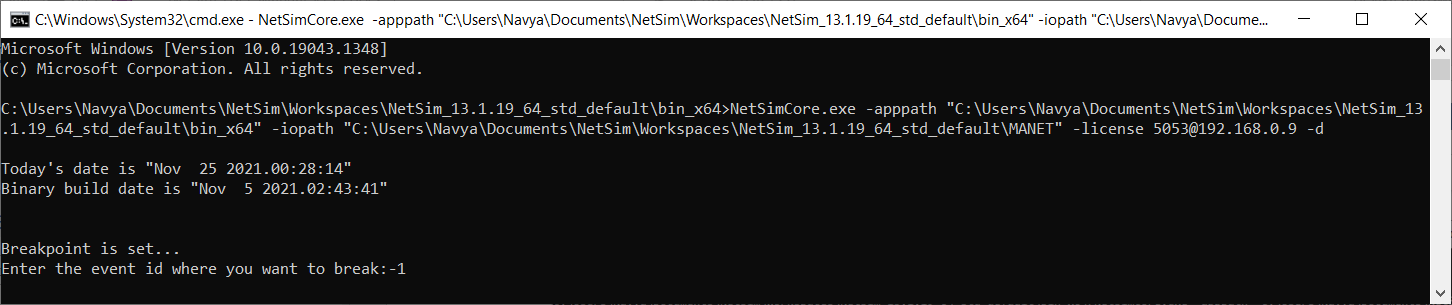
Figure 9‑38: Enter -1 as the event ID
Upon running, NetSim will write the file name and line number of the source code that generated each event.

Figure 9‑39: NetSim writes the file name and line number of the source code in Event Trace
In the above trace file Event Id 46 is triggered inside the IEEE802_11_Phy.c file which is present in IEEE802_11 project. Since all the lib files are opaque to the end user, you cannot see the source code of the lib file. However, Event Id 56 is triggered at line number 420 of IEEE802_11_Phy.c file and you can find the location of the event by opening the IEEE802_11_Phy.c file as shown below.
 Figure 9‑40: IEEE802_11_Phy.c file Code in Visual Studio
Procedure 2:
Step 1: Right click on my computer and select Properties.
Step 2: Go to Advanced System setting à Advanced Tab à Environment Variables.
Step 3: Click New. Type "NETSIM_BREAK" as Variable name and any negative integer as Variable value. Click OK.

Figure 9‑41: Environment Variables Window
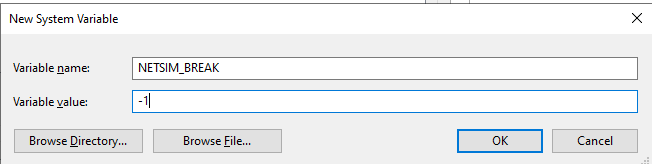
Figure 9‑42: Enter Variable name and Value in New System Variable
Step 4: Restart the system.
Step 5: Now perform simulation in NetSim (Enable event trace in GUI). Upon running, NetSim will write the file name and line number of the source code that generated each event.

Figure 9‑43: NetSim writes the file name and line number of the source code in Event Trace
Viewing & Accessing variables#
Viewing variables while debugging code
To see the value of a variable, when debugging the mouse over the variable name in the code. A text box with variable contents appears. If the variable is a structure and contains other variables, then click on the plus sign which is there to the left of the text box. Users can pin the variable to watch by clicking on the pin icon to the right of that variable in the text box.

Figure 9‑44: Viewing variables while debugging code
Adding the variable to watch

Figure 9‑45: Adding the variable to watch
Watch the change in the variable as the code progress by right clicking on the variable & clicking on \"add watch\" tab. This is useful if to continuously monitor the change in the variable as the code progresses.
Viewing external variables
During the process of debug users would come across variables that are defined outside the source file being built as a .dll. Such variables cannot be viewed directly when added in the watch tab, as this would throw the error.
Error: Identifier "pstruEventDetails" is undefined

Figure 9‑46: Viewing external variables
In the watch window, the variable which the user has to watch should be edited by double clicking on it and prefixing {,,NetworkStack.dll} to the variable name and pressing enter. (The name of the respective file in which the variable is defined should be mentioned - in this case NetworkStack.dll).

Figure 9‑47: Variable In the watch window
Accessing External Variables
Each protocol in NetSim has a separate Dll file which contains the variables and functions which can be shared. In case of cross layer protocol implementations variables of one protocol may have to be accessed from another Dll.
An example is given below showing how Physical layer parameters of devices running IEEE802.11 can be accessed in the Network Layer with DSR protocol configured.
The variable battery is defined in a structure stru_802_11_Phy_Var which is part of IEEE802_11_Phy.h file. So the user will have to access a pointer of type stru_802_11_Phy_Var. In the header file where the structure definition is given, the following line of code must be written --
#ifndef SHARE_VARIABLE

\_declspec(dllexport) IEEE802_PHY_VAR\* var1;

#else

\_declspec(dllimport) IEEE802_PHY_VAR\* var1;

#endif
In the example, the code line must be written in IEEE802_11_Phy.h file present inside IEEE802_11 folder.

Figure 9‑48: Code Modification done in IEEE802_11_Phy.h file present inside IEEE802_11 folder
In the main function where a user wishes to find the dReceivedPower_mw, the variable must be assigned the respective value. In the above case, the following line of code must be written inside fn_NetSim_IEEE802_11_PhyIn() function in IEEE802_11_Phy.c file present inside IEEE802_11 folder.
var1 = DEVICE_PHYVAR(pstruEventDetails->nDeviceId, pstruEventDetails->nInterfaceId);
Note that the parameters given in the macro or any function which assigns a value to the variable must be defined beforehand in the code. Here nDeviceId and nInterfaceId are defined beforehand.

Figure 9‑49: Code Modification done in IEEE802_11_Phy.c file present inside IEEE802_11 folder
The IEEE802_11 project must be built and the resulting libIEEE802.11.dll file which gets created in the bin_x64 folder of NetSim's current workspace.
C:\Users\PC\Documents\NetSim\Workspaces\\<Your default workspace>\bin_x64 for 64-bit
The Object file IEEE802_11.lib which is also got created in the bin_x64 folder located in the current workspace path
\<C:\Users\PC\Documents\NetSim\Workspaces\\<Your default workspace>\bin_x64 >
Place the created IEEE802_11.lib inside simulation lib x64 or lib folder as shown in below path.
\<C:\Users\PC\Documents\NetSim\Workspaces\\<Your default workspace\src\Simulation\
lib_x64>for 64-bit
Now expand the DSR project in solution explorer. For accessing the IEEE802_11 variable, the following lines must be added in DSR.h file.
#define SHARE_VARIABLE

#pragma comment(lib,\"IEEE802_11.lib\")

Figure 9‑50: Accessing the IEEE802_11 variable, Modification done in DSR.h file
Add the following lines of code to the DSR.c file as shown below.
#include \"../IEEE802_11/IEEE802_11_Phy.h\"

#include \"../BatteryModel/BatteryModel.h\"

Figure 9‑51: Add the following lines of code to the DSR.c file in DSR Project
In the fn_NetSim_DSR_Run() function add the following lines of code to print the value of dReceivedPower_mw variable from DSR project.
if (var1)

fprintf(stderr, \"\\n Remaining Energy(mJ): %lf\\n\",
battery_get_remaining_energy((ptrBATTERY)var1-\>battery));
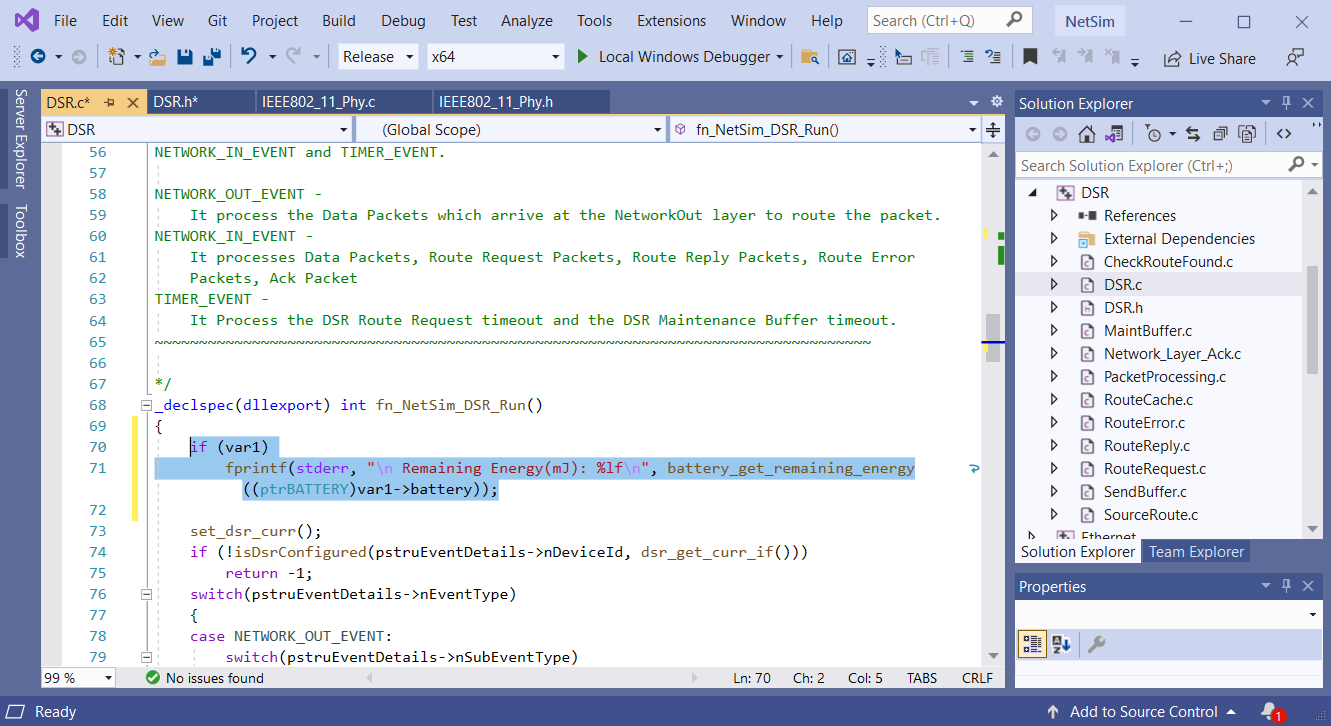
Figure 9‑52: Code Related to Remaining Energy for nodes
The DSR project must be built and the resulting libDSR.dll file gets created in the bin_x64 folder of NetSim's current workspace path
\< C:\Users\PC\Documents\NetSim\Workspaces\\<Your default workspace>\bin_x64> for 64-bit. When a scenario is run, the remaining energy of the node will be printed to the simulation console as shown below.

Figure 9‑53: Remaining energy of the node printed in NetSim console
Print to console window in NetSim#
Users can try printing the Device ID, Application ID, Duplicate Ack Count etc.
To print to console: Print node positions in MANET
Open Mobility Project, and in Mobility.c file go to fn_NetSim_Mobility_Run() function. Inside the default case add following codes
fprintf(stderr, \"\\n The position of %s at time %.2lfms is X=%.2lf and
Y = %.2lf \\n\", DEVICE_NAME(pstruEventDetails-\>nDeviceId),

pstruEventDetails-\>dEventTime,

DEVICE_POSITION(pstruEventDetails-\>nDeviceId)-\>X,

DEVICE_POSITION(pstruEventDetails-\>nDeviceId)-\>Y);

\_getch();

Figure 9‑54: Code for Print node positions in MANET
Building Mobility project creates libMobility.dll inside the binary folder(bin_x64) of NetSim's current workspace path
\<C:\Users\PC\Documents\NetSim\Workspaces\\<Your default workspace>\bin_x64 > for 64-bit.
Create a scenario in MANET and configure the mobility model of the nodes. During simulation users can notice that the positions of the nodes are displayed in the console w.r.t. the simulation time.
Creating a new packet and adding a new event in NetSim#
In this example we show how users can create their own packet & event in 802.15.4 Zigbee. The same methodology can be applied to any network / protocol.
-
Open the Source codes in Visual studio using the NetSim.sln file.
-
Go to ZigBee project and Open 802_15_4.h file and add a subevent called "MY_EVENT" inside enum_IEEE802_15_4_Subevent_Type as shown below.

Figure 9‑55: Add "MY_EVENT" inside enum_IEEE802_15_4_Subevent_Type
-
To add a new packet in NetSim first user has to initialize their new packet name inside 802_15_4.h file. Let us assume the new packet be "MY_PACKET" and it is a control packet. So, user has to define it inside the following enum as shown below Figure 9‑56

Figure 9‑56: Add "MY PACKET" inside enum_IEEE802_15_4_ControlPacket_Type
- We assume that MY_PACKET has the same fields as a Zigbee Ack and hence we are adding the following ack frame to 802_15_4.h file (Add this code just above the enum enum_IEEE_802_15_4_ControlPacket_Type {} defenition):
> struct stru_My_Frame
>
> {
>
> int nBeaconId;
>
> int nSuperFrameId;
>
> int nBeaconTime;
>
> double dPayload;
>
> double dOverhead;
>
> double dFrameSize;
>
> };
>
> typedef struct stru_My_Frame MY_FRAME;
>
> enum enum_IEEE_802_15_4\_ControlPacket_Type
>
> {
- Open 802_15_4.c file, go to the case TIMER_EVENT and add the following code to the subevent type.
case SUBEVENT_GETLINKQUALITY:

{

\-\-\-\-\-\-\-\-\-\-\-\-\-\-\-\-\-\-\-\-\-\-\-\-\--

}

break;

case MY_EVENT:

{

//my event//

fprintf(stderr, \"My_event\");

pstruEventDetails-\>dEventTime = pstruEventDetails-\>dEventTime + 1 \*
SECOND;

pstruEventDetails-\>nDeviceId = nGlobalPANCoordinatorId;

pstruEventDetails-\>nInterfaceId = 1;

pstruEventDetails-\>nEventType = TIMER_EVENT;

pstruEventDetails-\>nSubEventType = MY_EVENT;

pstruEventDetails-\>nProtocolId = MAC_PROTOCOL_IEEE802_15_4;

fnpAddEvent(pstruEventDetails);

fn_NetSim_WSN_MY_PACKET();

//my event//

}

break;
Here we are adding a new event inside the timer event, and this event will occur every 1 second in the GlobalPANCoordinator. i.e., sink node. In this event, fn_NetSim_WSN_MY_PACKET() is called as explained in step 5.
- Inside 802_15_4.c file, add the following code at the end of the file for sending ack (broadcast):
int fn_NetSim_WSN_MY_PACKET()

{

double dTime;

NETSIM_ID nDeviceId = pstruEventDetails-\>nDeviceId;

NETSIM_ID nInterfaceId = pstruEventDetails-\>nInterfaceId;

IEEE802_15_4\_MAC_VAR\* pstruMacVar = DEVICE_MACVAR(nDeviceId,
nInterfaceId);

IEEE802_15_4\_PHY_VAR\* pstruPhyVar = DEVICE_PHYVAR(nDeviceId,
nInterfaceId);

NetSim_PACKET\* pstruPacket = pstruEventDetails-\>pPacket;

NetSim_PACKET\* pstruAckPkt;

MY_FRAME\* pstruAck;

dTime = pstruEventDetails-\>dEventTime;

// Create MY_Frame

pstruAckPkt = fn_NetSim_Packet_CreatePacket(MAC_LAYER);

pstruAckPkt-\>nPacketType = PacketType_Control;

pstruAckPkt-\>nPacketPriority = Priority_High;

pstruAckPkt-\>nControlDataType = MY_PACKET;

pstruAck = fnpAllocateMemory(1, sizeof(MY_FRAME));

// Update packet fields

pstruAckPkt-\>nSourceId = nDeviceId;

pstruAckPkt-\>nTransmitterId = nDeviceId;

pstruAckPkt-\>nReceiverId = 0;

add_dest_to_packet(pstruAckPkt, pstruAckPkt-\>nReceiverId);

pstruAckPkt-\>pstruMacData-\>Packet_MACProtocol = pstruAck;

pstruAckPkt-\>pstruMacData-\>dArrivalTime = dTime;

pstruAckPkt-\>pstruMacData-\>dStartTime = dTime;

pstruAckPkt-\>pstruMacData-\>dEndTime = dTime;

pstruAckPkt-\>pstruMacData-\>dPacketSize =

pstruAckPkt-\>pstruMacData-\>dOverhead;

pstruAckPkt-\>pstruMacData-\>nMACProtocol = MAC_PROTOCOL_IEEE802_15_4;

pstruAckPkt-\>nPacketId = 0;

strcpy(pstruAckPkt-\>szPacketType, \"MY_PACKET\");

//to see the packet in animation

// Add SEND ACK subevent

pstruEventDetails-\>dEventTime = dTime;

pstruEventDetails-\>dPacketSize =

pstruAckPkt-\>pstruMacData-\>dPacketSize;

pstruEventDetails-\>nSubEventType = 0;

pstruEventDetails-\>nEventType = PHYSICAL_OUT_EVENT;

pstruEventDetails-\>pPacket = pstruAckPkt;

fnpAddEvent(pstruEventDetails);

//Free the packet

fn_NetSim_Packet_FreePacket(pstruPacket);

pstruPacket = NULL;

return 0;

}
- Inside the above function NetSim API
fn_NetSim_Packet_CreatePacket(MAC_LAYER); is used. This is the API which creates a new packet in NetSim. Since in this example, new packet is created in MAC layer, it is passed as an argument. Users can give the respective Layer name for creating packets in any other layers. In the above code users can see the following line:
strcpy(pstruAckPkt->szPacketType, \"MY_PACKET\");
This is used visualize the packet transmission in the packet animation.
- In 802_15_4.c file, goto fn_NetSim_Zigbee_Init() function and add the following code in red color to call the timer_event. i.e. MY_EVENT
\_declspec(dllexport) int fn_NetSim_Zigbee_Init()

{

//MY_EVENT

pstruEventDetails-\>nDeviceId = nGlobalPANCoordinatorId;

pstruEventDetails-\>nInterfaceId = 1;

pstruEventDetails-\>dEventTime = pstruEventDetails-\>dEventTime;

pstruEventDetails-\>nEventType = TIMER_EVENT;

pstruEventDetails-\>nSubEventType = MY_EVENT;

pstruEventDetails-\>nProtocolId = MAC_PROTOCOL_IEEE802_15_4;

fnpAddEvent(pstruEventDetails);

//MY_EVENT

return fn_NetSim_Zigbee_Init_F();

}
In the above function, subevent type, "MY_EVENT" is called. So this function calls the MY_EVENT, timer event to execute.
- fn_NetSim_Zigbee_Trace() is an API to print the trace details to the event trace. So inside 802_15_4.c file add the following lines of code in red color inside fn_NetSim_Zigbee_Trace(int nSubEvent) as shown below:-
\_declspec (dllexport) char\* fn_NetSim_Zigbee_Trace(int nSubEvent)

{

if (nSubEvent == MY_EVENT)

return \"MY_EVENT\";

return (fn_NetSim_Zigbee_Trace_F(nSubEvent));

}
- Save the code and build Zigbee project, libZigBee.dll will get created in the bin folder of NetSim's current workspace path.
\< C:\Users\PC\Documents\NetSim\Workspaces\\<Your default workspace>\bin_x64 > for 64-bit.
-
Create a basic scenario in WSN with 2 sensors and 1 sink node.
-
While creating the application between two sensors, set
Application Type - Sensor App
Interarrival Time - 5000
-
Run simulation for 10 seconds.
-
Play packet animation. Here users can see that Sink node broadcasts "MY_PACKET" to the sensor.

Figure 9‑57: In animation window Sink node broadcasts "MY_PACKET" to the sensor
- Also, open packet trace and users can filter the control packet and see all the packet details of "MY_PACKET" written in the packet trace.

Figure 9‑58: Filter the Packet Type to control packet and See "MY_PACKET" in Packet Trace
- To analyze the "MY_EVENT" users can open event trace and filter the subevent type as "MY_EVENT". Here users can analyze that the event occurs for every 1 seconds.

Figure 9‑59: Filter Subevent type to "MY_EVENT"
NetSim API's#
NetSim provides a wide variety of APIs for protocol developers. These are available in
-
packet.h -- Packet related APIs
-
Create a new packet.
-
fn_NetSim_Packet_CreatePacket_dbg(int nLayer,int line,const char* file);
-
Copy a packet into a new packet.
-
fn_NetSim_Packet_CopyPacket_dbg(const NetSim_PACKET* pstruPacket,int line,const char* file);
-
Create error in packet.
-
fn_NetSim_Packet_DecideError(double dBER, long double dPacketSize);
-
Free a packet
-
fn_NetSim_Packet_FreePacket_dbg(NetSim_PACKET**pstruPacket,int > line,char* file);
-
stack.h -- Network / device / link and event related APIs
-
Calculate distance between nodes.
-
fn_NetSim_Utilities_CalculateDistance(NetSim_COORDINATES* > coordinate1,NetSim_COORDINATES* coordinates2);
-
Stores the event details. Only one-time memory is allocated. Most > used variable
-
struct stru_NetSim_EventDetails* pstruEventDetails;
-
Retrieve values from xml file.
-
GetXmlVal(void* var,char* name,void* xmlNode,int flag, > XMLDATATYPE type);
-
list.h -- Optimized list operation calls since NetSim uses lists extensively.
- Add elments in list.#
-
list_add(void** list,void* mem,size_t offset,int (*check)(void* > current,void* mem));
-
Sorting the list
-
list_sort(void** list,size_t offset,int (*check)(void* current, > void* mem));
-
IP_Addressing.h -- For setting & getting IP address per the appropriate format.
-
Set Ip address of any node.
-
NETSIM_IPAddress
-
Checking ip address is broadcast or multicast.
-
isBroadcastIP(NETSIM_IPAddress ip);
-
isMulticastIP(NETSIM_IPAddress ip);
For detailed help please refer the appropriateheader (.h) files inside:/NetSim_Standard/src/simulation/include or read through the doxygen source code documentation available inside Home Page under Documentation > source code Help
-
Include all the header (.h) files from the include folder.
-
NetworkStack.lib is a "import library" file and has the definitions for the functions present in the NetworkStack.dll
-
When developing new protocols users should create their own protocol.h and declare all the protocol specific variables here. Stack & packet related variables should be used from stack.h and packet.h
[NetSim Network Stack calling individual Protocol.]{.underline}
Every protocol should provide the following APIs as hooks to the network stack:
-
int (*fn_NetSim_protocol_init)(conststruct stru_NetSim_Network*,conststruct stru_NetSim_EventDetails*,constchar*,constchar*,int,constvoid**);
-
Using this API the stack passes all the relevant pointers to variables, paths etc needed for the protocol. Inside this function a) local variables should be initialized, b) Initial events if any should be written, eg: Hello packet in RIP, STP in Ethernet c) File pointers for reading & writing protocol_specific_IO files.
-
int (*fn_NetSim_protocol_Configure)(conststruct stru_NetSim_Network*,int nDeviceId, int nINterfaceID, int nlayertype, fnpAllocateMemory, fnpFreeMemory, fpConfigLog );
-
The stack calls this API when reading the config file. Upon reaching the appropriate protocol definition in the XML file, the stack calls this and passes all these pointers to the protocol.
-
int (*fn_NetSim_protocol_run)(): This is called by the stack to run the protocol
-
char* (*fn_NetSim_protocol_trace)(int): This called by the stack to write the event trace
-
int(*fn_NetSim_protocol_CopyPacket)(constNetSim_PACKET* pstruDestPacket,const NetSim_PACKET* pstruSrcPacket):
-
This is for copying protocol specific parameters / data into the packed
-
int (*fn_NetSim_protocol_FreePacket)(const NetSim_PACKET* pstruPacket): The this to free the protocol specific parameters / data in the packet
-
(*fn_NetSim_protocol_Metrics)(const FILE* fpMetrics): This is to write the metrics file upon completion of the simulation
-
int (*fn_NetSim_protocol_Finish)(): To release all memory after completion
-
char* (*fn_NetSim_protocol_ConfigPacketTrace)(constvoid* xmlNetSimNode); To configure the packet packet trace in terms of the parameters to be logged
-
char* (*fn_NetSim_protocol_WritePacketTrace)(const NetSim_PACKET*); To configure the event trace in terms of the parameters to be logged.