Steps at Destination PC#
- Follow steps as provided before in “Emulation Set-up: Setting up the NetSim Client”.
Run FileZilla Server software. Create a group by going to Edit → Groups → Select “General” under Page: → Click Add in Groups → Give Any Name (Ex: Admin) and click ok.

- Go to Edit → User → General → Click Add in User → Give Any Name (Ex: User1) and Select Group what you given in Group Setting (In this case, we provide “Admin”) and click ok.

- In Account Setting, select Enable account and set password and click ok.

- Go to Shared folder → Add Folder to share (EX: FTP_FILES from Desktop) → Select all the Files and Directories Permissions and set that folder as Home Directory by selecting “Set as Home Dir”. Click OK

Steps at Source PC#
Follow steps as provided before in “Emulation Set-up: Setting up the NetSim Client”. Run FileZilla Client software. Enter the Host Name(Server System ip (EX: 192.168.0.133)) and Give the User, Password that we created in Server side and give Port No = 21. Run Emulation server and click Quick Connect. Drag and drop files from Local Site to Remote Site
Steps at NetSim Emulation Server#
- Run NetSim in Administrative Mode and create a basic network Scenario in any stack-based protocol (Any network except Legacy Networks, Cellular Networks, and Wireless Sensor Networks) in NetSim. A sample scenario in Internetworks is performed as shown with link speed set to 1 Mbps.

- Click on the Application icon present on the ribbon and set properties.
- In the Application Type select Emulation.
- Select Source and Destination ID according to the network scenario and change the Source and Destination IP address according to the IP Address of the real system and click OK.
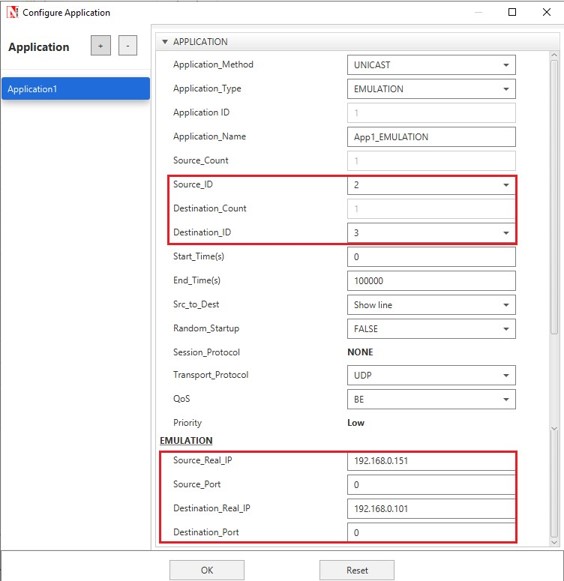
- Provide the Simulation Time as how long you want the Emulation to be performed. Make sure client system(s) are ready and then click Run Simulation.
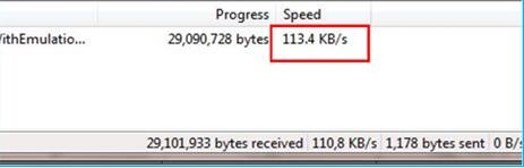
Results#
Transfer speed from client without emulation

Transfer speed from client with emulation: